Tame Kitchen Chaos: 7 Essential Utensil Organization Hacks
Share
You're tired of wasting time searching for utensils in your cluttered kitchen. To tame the chaos, start by purging and categorizing your utensils, getting rid of duplicates and unnecessary items. Assign a home for each utensil, utilizing vertical storage space and maximizing corner areas. Optimize your drawer organization with dividers and color-coding, and hang frequently used utensils for easy access. Contain small items efficiently with compact caddies and magnetic strips. By implementing these essential hacks, you'll save time, reduce stress, and transform your kitchen into a functional haven. Now, take the next step to a more organized you.
Key Takeaways
• Purge and categorize utensils by type, size, and frequency of use to declutter and optimize storage.
• Assign a designated home for each utensil, grouping similar items together and utilizing vertical storage and corner spaces.
• Use dividers, color-coding, and magnetic strips to maximize storage and organization in drawers and on countertops.
• Implement hanging utensil storage solutions, such as pegboards and hooks, to free up counter space and add a decorative touch.
• Create zones for specific utensils and tasks to streamline meal preparation and reduce stress in the kitchen.
Purge and Categorize Utensils First
Before you start organizing, take everything out of your kitchen drawers and categorize your utensils into groups, such as baking, cooking, and serving tools, to get a sense of what you have and what you can get rid of. This step is pivotal in understanding your utensil collection and identifying duplicates or unnecessary items.
As you categorize, sort your utensils by size and color to visualize how they can be stored efficiently. For instance, group all your wooden spoons together, followed by your silicone spatulas, and so on. Arrange your utensils by material, such as metal, wood, or plastic, to create a cohesive system. You can also arrange them by usage, like frequently used items versus occasional ones.
This process will help you decide what to keep, donate, or discard, freeing up space in your kitchen. By purging and categorizing your utensils, you'll be able to create a tailored organization system that suits your cooking style and makes meal prep a breeze.
Assign a Home for Each Item
Now that you've purged and categorized your kitchen utensils, it's time to give each item a designated home.
You'll want to create zones within your kitchen where specific utensils are stored, making them easy to find and access when you need them.
Designate Utensil Zones
Assign a specific spot for each utensil, making it easy to find what you need when you need it. This is the foundation of a well-organized kitchen. By designating a home for each item, you'll avoid the frustration of digging through drawers or countertops to find that one tool.
To get started, take stock of your utensils and group similar items together, such as baking tools or cooking utensils. Then, create a functional layout that makes sense for your kitchen workflow. For example, store frequently used items near the cooking area, and less-used items towards the back.
To take your organization to the next level, consider color coding your utensils. Use dividers or bins in different colors to categorize your items, making it easy to spot what you need at a glance. This visual system will help you quickly identify where each utensil belongs, keeping your kitchen tidy and efficient.
Label Station Assignments
With your utensil zones established, it's time to get specific and label each station, making certain that every item has a designated home where you can easily find and return it. This is where you get to prioritize your most frequently used items and give them a prominent spot.
Here are three labeling hacks to get you started:
-
Color code your labels to categorize utensils by type, like baking, cooking, or prep.
-
Assign a place for each item, making it easy to return it after use.
-
Customize your labels with icons or images to make them more visually appealing and easy to recognize.
As you label each station, rotate your utensils to make sure the most frequently used ones are front and center. This way, you'll save time and energy when cooking.
Utilize Vertical Storage Space
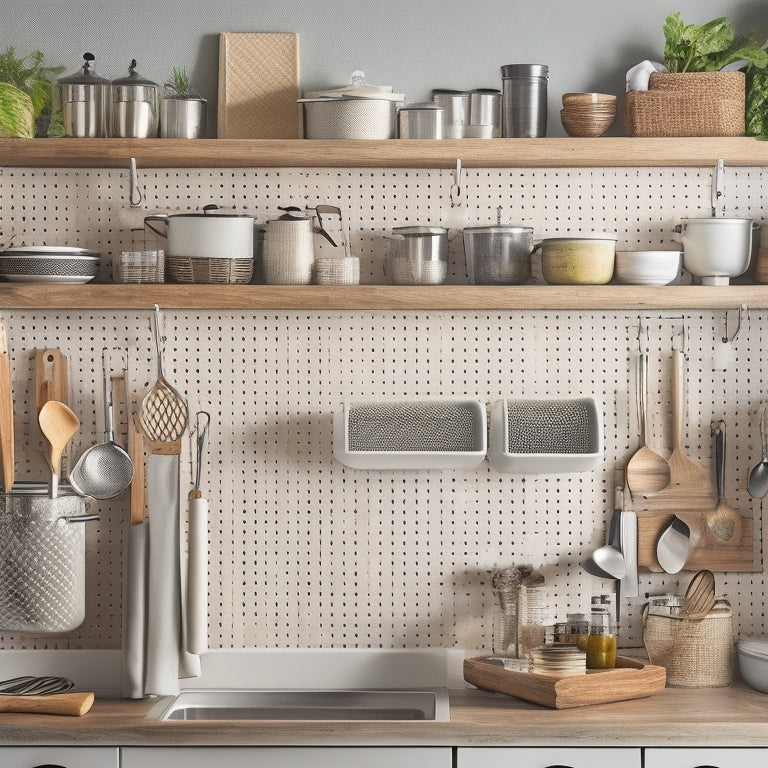
You can maximize your kitchen's storage capacity by installing shelves, hooks, or a pegboard on walls or the back of a door, keeping frequently used utensils within easy reach. This will free up counter space and make cooking more efficient. By utilizing vertical storage space, you'll be able to store more items without taking up valuable floor space.
Here are some ideas to get you started:
| Storage Solution | Utensils to Store | Benefits |
|---|---|---|
| Wall hooks | Pots, pans, utensils with holes | Easy to install, adjustable |
| Magnetic strips | Spatulas, whisks, knives | Strong holding power, easy to clean |
| Pegboard | Spoons, ladles, can openers | Customizable, easy to rearrange |
| Over-the-door storage | Infrequently used items, special occasion dishes | Maximizes door space, easy to access |
| Floating shelves | Cookbooks, decorative items, small appliances | Adds visual interest, adjustable |
Optimize Your Drawer Organization
Now that your walls and doors are optimized for storage, it's time to tackle the often-cluttered kitchen drawers that hold the majority of your utensils and gadgets. To maximize the space, you'll need to get intentional about how you organize the contents.
Here are three essential strategies to get you started:
-
Color code your utensils: Group similar items by color to create a visually pleasing and easy-to-navigate system.
-
Use drawer dividers: Separate your utensils into categories, such as baking, cooking, and serving, to prevent clutter from building up again.
-
Assign a home for each item: Designate a specific spot for each utensil, making it easy to find what you need when you need it.
Make the Most of Corner Areas
When it comes to maximizing your kitchen's corner areas, you're probably thinking, 'What's the best way to use this often-wasted space?'
You'll be happy to know that with a few simple solutions, you can turn those corners into valuable storage hubs. By installing corner shelves or carousel systems, you'll be able to easily access and store your kitchen utensils, keeping them organized and within reach.
Utilize Corner Shelves
By incorporating corner shelves into your kitchen design, every inch of available space is optimized, effectively creating additional storage for your utensils and gadgets. This clever trick allows you to make the most of often-wasted corner areas, giving you more room to breathe and work efficiently.
Here are three ways to maximize your corner shelves:
-
Opt for adjustable shelves to accommodate utensils of various sizes.
-
Install a lazy Susan to make it easy to access items in hard-to-reach areas.
-
Use baskets or bins to keep small items organized and within sight.
When it comes to corner shelves, you don't have to stick to traditional designs. Consider corner shelf alternatives, such as a pegboard or a magnetic board, to add some creativity to your space-saving efforts.
Install Carousel Systems
You can further optimize your kitchen's corner areas by installing carousel systems, which allow you to access items in the back of the corner without having to dig through everything in front of them. These systems typically consist of rotating holders that can be customized to fit your specific needs.
By installing a carousel system, you'll be able to easily spin the unit to retrieve the items you need, making the most of the often-wasted space in your kitchen's corners.
Carousel systems are especially useful for storing kitchen gadgets, cookbooks, and other items that you don't use frequently. You can also use them to organize your spices, oils, or condiments, keeping them within easy reach.
Consider combining a carousel system with a lazy susan for maximum efficiency. This will enable you to access items from multiple angles, making it even easier to find what you need when you need it.
Hang Utensils for Easy Access
Maximize your kitchen's vertical space by installing a pegboard or hooks to hang frequently used utensils, keeping them within easy reach. This hack not only saves counter space but also adds a touch of utensil display to your kitchen decor. You'll be amazed at how this simple solution can elevate your kitchen's aesthetic while maintaining functionality.
Here are three creative ways to hang your utensils:
-
Pegboard with Hooks: Attach a pegboard to a wall or the back of a cabinet door and hang your utensils using hooks. This is a great way to customize your utensil display and add a personal touch to your kitchen.
-
DIY Utensil Holders: Create your own utensil holders using reclaimed wood, metal, or even 3D-printed designs. This adds a touch of creativity to your kitchen while keeping your utensils organized.
-
Magnetic Strips: Use magnetic strips to hang your metal utensils, such as knives, spoons, and spatulas. This is a great space-saving solution for small kitchens.
Contain Small Items Efficiently
Now that your frequently used utensils are hung and easily accessible, turn your attention to containing small items like spices, oils, and condiments that can clutter your countertops. These tiny items can quickly add up and make your kitchen look disorganized.
To keep them under control, use drawer dividers to separate them from other kitchen items. You can also attach magnetic strips to the side of a cabinet or fridge to store spices, oils, or frequently used condiments.
For more storage, consider compact caddies that can be placed on a countertop or mounted on a wall using wall hooks. These caddies can hold a variety of small items, keeping them visible and within reach.
By containing these small items, you'll be able to quickly find what you need, reducing cooking time and stress. Plus, your countertops will look more streamlined and organized.
Frequently Asked Questions
How Often Should I Clean and Maintain My Utensil Organization System?
Don't you wish your utensil organization system stayed spotless forever? Set a cleaning frequency, like weekly or bi-weekly, to guarantee longevity. Implement DIY organization tips, like categorizing and storing utensils by type, to make maintenance a breeze.
Can I Use Adhesive Hooks on My Kitchen Cabinets or Walls?
You can use adhesive hooks on your kitchen cabinets or walls, but consider alternatives like 3M Command Strips or screw-in hooks for added durability, and explore utensil organization tips that maximize your space.
What Is the Best Material for Utensil Organizers: Plastic, Wood, or Metal?
You're at a crossroads, and the right utensil organizer material can make all the difference. Opt for metal for rust resistance, or choose eco-friendly wood or plastic options that fit your style and won't break the bank.
How Do I Organize Utensils With Long Handles Like Spoons and Spatulas?
You'll tame utensil chaos by storing long-handled spoons and spatulas in dedicated drawer dividers or hanging baskets, keeping them organized, visible, and easily accessible, freeing up space and streamlining your kitchen workflow.
Are Over-The-Door Utensil Organizers Effective for Small Kitchens?
You've got a million utensils cluttering your tiny kitchen, but over-the-door organizers can be a lifesaver! They're perfect for small kitchens, offering easy access to utensils while keeping them out of the way, unlike drawer dividers or hanging baskets that take up precious space.
Related Posts
-

What Makes a Closet Organization System Efficient?
You achieve an efficient closet organization system by understanding your space, purging clutter, and categorizing be...
-

Streamline Your Space: Efficient Home Systems
You're already surrounded by the tools and spaces you need to live more efficiently, but they're being held back by c...
-

Boost Productivity With a Home Office Makeover
By altering your home office into a clutter-free, ergonomic, and inspiring space, you'll reveal your full productivit...


