
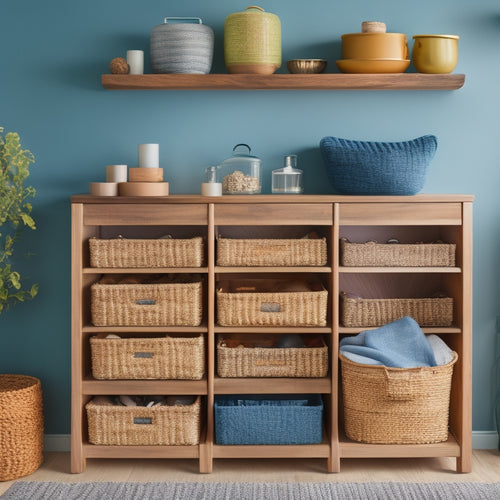
Create Custom Closet Storage Bins on a Budget
You can create stunning custom closet storage bins on a budget by transforming old crates, boxes, and plastic containers into unique storage solutions. Upcycle cardboard boxes with paint and stencils, or refurbish old baskets with a fresh coat of paint or decorative trim. Fabric storage containers, made with sewing techniques, can add a pop of color and texture to your closet. With a little creativity, you can turn IKEA products into stylish storage bins. Get ready to open up your creative potential and turn your closet into a stylish oasis with these budget-friendly hacks. Next, discover how to take your closet organization to the next level.
Key Takeaways
• Repurpose old crates, boxes, and containers to create custom closet storage bins at little to no cost.
• Utilize fabric storage solutions like DIY fabric bins and foldable containers for a stylish and practical approach.
• Get creative with customization techniques like paint, stencils, and decoupage to give your bins a personalized touch.
• Transform IKEA products into custom storage solutions, saving money and adding functionality to your closet.
• Create DIY wicker and wooden bins using essential materials and a hot glue gun for a budget-friendly and visually appealing solution.
Repurpose Old Crates and Boxes
You can breathe new life into old crates and boxes by transforming them into custom closet storage bins that are both functional and budget-friendly. With a little creativity and some DIY magic, you can turn those dusty, forgotten containers into stylish and practical storage solutions.
The key to successful crate organization is to think outside the box (pun intended!). Start by cleaning and disinfecting your crates, then get creative with paint, stencils, or decoupage to give them a fresh new look. Add some casters or handles to make them easy to move around, and voilà! You've got yourself a one-of-a-kind storage bin that's both eco-friendly and budget-friendly.
Repurposing techniques like these aren't only good for the environment, but they're also a great way to add a personal touch to your closet space. So, next time you're tempted to toss that old crate, think twice – it might just become your new favorite storage solution!
Utilize Fabric Storage Containers
With your repurposed crates in place, now it's time to bring in some soft, stylish storage with fabric containers that can add a pop of color and texture to your closet. You can create your own fabric storage bins using simple sewing techniques and some creative thinking. The best part? You can customize them to fit your personal style and closet needs.
Here are some ideas to get you started:
| Fabric Choice | Sewing Technique | Customization Options |
|---|---|---|
| Cotton prints | Simple running stitch | Add labels or pockets for extra organization |
| Canvas or denim | Reinforced seams | Incorporate ribbons or ties for easy carrying |
| Faux suede or velvet | Hidden seams | Add a lining for a professional finish |
| Repurposed t-shirts | Upcycled fabric | Add embellishments like buttons or appliques |
From bold prints to neutral tones, the fabric options are endless. Plus, with DIY fabric bins, you can choose the size, shape, and style that fits your closet's unique needs. Get creative, and don't be afraid to experiment with different sewing techniques and customization options. Your closet (and your clothes) will thank you!
Transform Cardboard Boxes
Now it's time to breathe new life into those cardboard boxes collecting dust in your closet.
You'll be surprised at how a simple transformation can turn them into stylish storage bins that blend seamlessly with your custom closet design.
Box Makeover Ideas
Transforming cardboard boxes into custom closet storage bins is a clever way to repurpose household items and add a personal touch to your storage solutions. It's time to get creative and think outside the box (pun intended)! With a little TLC, you can turn those bland, brown boxes into functional and stylish storage bins that fit your unique style.
Here are some box makeover ideas to get you started:
-
Paint it like you mean it: Try out different box painting techniques to add a pop of color or a subtle texture to your storage bins. You can also add fun designs or patterns to make them more visually appealing.
-
Add a label, add some flair: Use stickers, stamps, or even hand-drawn labels to give your bins a personalized touch. This is also a great way to categorize your storage and make it easier to find what you need.
-
Crate expectations: Turn your cardboard boxes into crate storage solutions by adding wooden or paper crates to give them a rustic, industrial look.
- Get wrapped up: Use fabric scraps or paper to decoupage your bins and add a touch of elegance to your storage solutions. This is a great way to incorporate fabric bin organization into your closet design.
Now, get creative and give your cardboard boxes a makeover!
Decorate With Fabric
You'll add a whole new level of sophistication to your closet storage bins by wrapping them in fabric, a simple yet effective way to conceal the cardboard beneath while infusing your space with texture and pattern. This budget-friendly decor hack is a game-changer for creating custom closet storage on a dime.
Choose fabrics that complement your closet's color scheme and style, or go bold with contrasting patterns and hues. To get started, measure your boxes and cut your fabric to size, leaving a few inches of extra material for wrapping. Use a hot glue gun to secure the fabric in place, working your way around the box in sections. Add a few decorative staples or ribbons for a finishing touch.
With fabric storage ideas, the possibilities are endless – from modern geometric prints to vintage-inspired florals. Get creative, and transform those bland cardboard boxes into stylish storage bins that elevate your closet's style without breaking the bank!
Add Labels Easily
Take your newly wrapped fabric storage bins to the next level by adding labels that instantly convey what's inside, making it easy to find what you need in a snap. You've already scored major points in the style department, now it's time to bring function to the table.
Labels are the secret ingredient to making your closet storage bins truly functional. They'll help you and your family members quickly identify what's inside, saving you time and reducing clutter.
Here are some labeling techniques to try:
-
Chalkboard labels: Add a touch of rustic charm with chalkboard labels that can be easily erased and rewritten.
-
Sticker labels: Brighten up your bins with colorful sticker labels that add a pop of personality.
-
Printable labels: Design your own labels using a printer and some cardstock for a more polished look.
- Handwritten labels: Keep it simple with handwritten labels that add a personal touch.
Upcycle Plastic Containers
Gather those empty plastic containers from your pantry, like old oatmeal or coffee containers, and get ready to breathe new life into them as custom closet storage bins. You'll be amazed at how a little creativity can turn trash into treasure.
Start by giving those containers a fresh coat of paint – yes, you can paint plastic! Choose a color that matches your closet's vibe, or go bold and bright to add some visual interest. Once the paint is dry, it's time to revamp those containers. Add some decorative tape or stickers to give them a personalized touch. You can also attach small labels or tags to identify what's inside (we'll get to that part in a minute).
Now, think about the shape and size of your containers. Can you stack them to maximize vertical storage? Can you use them to store accessories like scarves or belts? Get creative and experiment with different layouts until you find one that works for you.
With a little bit of TLC, those humble plastic containers will be transformed into custom closet storage bins that are both functional and fabulous!
Create Custom Labels
Now that you've revamped those plastic containers, it's time to add a finishing touch with custom labels that identify what's inside and add a touch of personality to your closet storage system. This is where you get to unveil your creativity and make your storage bins truly one-of-a-kind. But don't worry, you don't need to be a design expert to create labels that pop.
Here are some tips to get you started:
-
Keep it simple: Use a clear, easy-to-read font and a concise description of what's inside the bin.
-
Add a dash of personality: Incorporate your favorite colors, patterns, or quotes to give your labels a personal touch.
-
Use a consistent design: Choose a design theme and stick to it to create a cohesive look throughout your closet.
- Make it functional: Include labels that indicate the category or type of items stored in each bin, such as 'Tops' or 'Accessories'.
Use IKEA Hacks
You can repurpose IKEA's affordable and versatile products to create custom closet storage bins that are both functional and stylish. With a little creativity, you can transform IKEA furniture into unique storage solutions that fit your closet's specific needs.
For instance, you can use IKEA's KALLAX shelving unit as a base and add wooden crates or baskets to create a one-of-a-kind storage bin. Or, take IKEA's RASKOG cart and attach woven baskets or fabric bins to create a mobile storage solution.
The beauty of IKEA hacks is that you can customize them to fit your personal style and closet layout. Plus, you'll save money by repurposing affordable IKEA products instead of buying expensive custom storage solutions.
With a few simple modifications, you can turn IKEA furniture into functional and fashionable storage bins that will keep your closet organized and clutter-free. So, get creative and start hacking those IKEA pieces to create the custom closet storage bins of your dreams!
DIY Wicker Storage Bins
You're about to get creative and craft your own DIY wicker storage bins that'll add a touch of natural charm to your custom closet.
To get started, you'll need to gather the right materials, measure and cut the wicker to size, and then assemble and finish your bins with a personal touch.
With a few simple steps, you'll be transforming plain spaces into organized oases that reflect your personal style.
Wicker Bin Materials Needed
Five essential materials will come together to form the foundation of your DIY wicker storage bins, each playing a pivotal role in bringing your custom closet storage vision to life.
Here are the must-haves for your wicker bin customization project:
-
Wicker basket frames: These will provide the structure for your bins. Look for cost-effective options at your local craft store or online.
-
Wicker weaving material: This can be rattan, reed, or even paper-based wicker. Choose a material that suits your creative design and budget.
-
Fabric of your choice: Pick a fabric that complements your closet's aesthetic. You can opt for a striking print or a neutral tone, depending on your personal style.
- Quality hot glue gun: This will help you attach the fabric to the wicker frame. Don't compromise on the glue gun – you want a strong bond to secure your bins are robust.
With these materials, you'll be well on your way to creating unique, economical, and functional storage bins that reflect your personal style.
Measuring and Cutting Wicker
To guarantee a snug fit and precise design, carefully measure the dimensions of your wicker basket frames, taking into consideration the size and shape of your storage bins. You don't want your wicker pieces to look like they're wearing oversized clothes, do you? Get out your trusty tape measure and jot down the lengths, widths, and heights of each frame. Don't forget to account for the basket handles, which will add a touch of elegance to your design.
Next, use your measurements to cut the wicker into precise pieces. You can use a craft knife or scissors, depending on the type of wicker you're working with.
As you cut, imagine the beautiful basket weaving design ideas that will soon come to life. Think about how the wicker pieces will fit together seamlessly, creating a sturdy and functional storage bin.
Assembly and Finishing Touches
With your precisely cut wicker pieces in hand, start assembling your storage bins by attaching the sides to the base, ensuring a snug fit that echoes the elegant simplicity of your original design. As you build, imagine the satisfaction of storing your belongings in a stylish, custom-made bin that's both functional and fabulous.
To take your DIY project to the next level, consider these finishing touches:
-
Paint techniques: Add a pop of color or subtle texture with a distressed finish, ombre effect, or bold stripes.
-
Hardware accents: Elevate your design with ornate knobs, rustic hinges, or sleek metal handles that reflect your personal style.
-
Stencil designs: Add a touch of whimsy with playful patterns, monograms, or inspirational quotes that make your storage bins truly unique.
- Knob options: Choose from a variety of materials, such as glass, ceramic, or wood, to add a decorative flourish to your bins.
Refurbish Old Baskets
You can breathe new life into old baskets by repurposing them as custom closet storage bins, often with just a fresh coat of paint or some decorative trim. It's like a mini-makeover for your baskets! Not only will you reduce waste, but you'll also give your closet a unique, eclectic touch.
Here are some ideas to get you started:
| Technique | Materials | Time |
|---|---|---|
| Basket Painting | Paint, brushes | 30 minutes |
| Basket Lining | Fabric, glue | 1 hour |
| Basket Weaving | Twine, scissors | 2 hours |
Try basket painting with bold colors or soft pastels to match your closet's aesthetic. Add a touch of elegance with basket lining, using a pretty fabric that complements your closet's decor. Or, get creative with basket weaving and add some natural charm to your storage bins. With a little patience and imagination, you can turn old, worn-out baskets into beautiful custom closet storage bins that reflect your personal style. So, grab those old baskets and get creative!
Make Foldable Fabric Bins
Foldable fabric bins are a clever solution for custom closet storage, offering flexibility and versatility as you can easily move them around or fold them up when not in use. Plus, they're a budget-friendly way to add a pop of color and texture to your closet.
To make your own, you'll need some basic sewing techniques and a few simple materials.
Here's what you'll need to get started:
- Fabric of your choice: Pick a fun print or solid color that matches your closet's style.
- Interfacing or stabilizer: This adds structure and helps the bin hold its shape.
- Thread and a sewing machine: Time to get creative and stitch those seams!
- Measuring tape and scissors: For cutting and measuring your fabric accurately.
With these basics, you can create a foldable fabric bin that's both functional and fashionable. Simply sew the sides and bottom together, leaving the top open, and you've got a cute and practical storage solution.
Plus, it's easy to fold up and store when not in use, making it perfect for small closets or changing seasons.
Happy sewing!
Craft Wooden Crate Shelves
Now that you've decided to craft wooden crate shelves, it's time to get started!
You'll need to select the perfect wooden crates to fit your closet's style and size. Then assemble them into sturdy shelves that can hold your storage bins.
Wooden Crate Selection
Selecting the right wooden crates is essential to creating a stylish and functional storage system, as they form the foundation of your custom closet shelves. You want crates that are sturdy, visually appealing, and fit your closet's unique dimensions.
When browsing for crates, consider the following key factors:
-
Size: Measure your closet space to determine the ideal crate size. You can also mix and match different sizes to create a visually interesting storage system.
-
Material: Wooden crates come in various types, such as pine, cedar, or reclaimed wood. Choose a material that fits your aesthetic and budget.
-
Condition: You can opt for brand-new crates or repurpose old ones. Either way, make sure they're sturdy and can hold the weight of your storage items.
- Customization potential: Think about how you can transform your crates with crate painting techniques to match your closet's style. Will you add a distressed finish or a pop of color?
Crate Shelving Assembly
With your crates carefully chosen, it's time to bring your storage system to life by assembling the shelving units that will transform your closet. Gather your tools, and let's get creative! You'll need a drill, screws, and some patience (just kidding, it's easier than you think).
Start by arranging your crates in a way that makes sense for your closet space. You can stack them, place them side by side, or create a funky pattern – the possibilities are endless! Once you have your layout, use screws to attach the crates to each other, making sure they're secure and even. Don't worry if it gets a little messy; it's all part of the process.
As you assemble your crate shelving, remember that this is a budget-friendly storage solution that's all about customization. You're creating a space that's uniquely yours, and that's what makes it so awesome.
With your crates in place, you'll be amazed at how much more organized and peaceful your closet feels. It's time to take your crate shelving organization to the next level and make the most of your closet space!
Adding Decorative Touches
You're one step away from transforming your crate shelving into a stunning storage system that reflects your personal style, and that's where decorative touches come in. It's time to add some flair to your functional storage bins!
To take your crate shelving to the next level, consider these decorative elements:
-
Painted baskets: Add a pop of color with painted baskets that match your closet's theme. You can choose a bold hue or a soft pastel, depending on your style.
-
Fabric lined crates: Add a touch of elegance with fabric-lined crates. Choose a patterned fabric that complements your closet's decor, or go for a solid color that adds a subtle sophistication.
-
Add some greenery: Place a small potted plant or a vase with fresh flowers on your crate shelves to bring in a natural touch.
- Personalized labels: Create custom labels with your name or a fun phrase to add a personal touch to your storage bins.
Frequently Asked Questions
Can I Use Custom Closet Storage Bins for Other Room Organization?
You're thinking beyond the closet, aren't you? You can totally repurpose those custom bins for kitchen organization, storing snacks or spices, or even bathroom storage, hiding toiletries or towels - get creative and conquer clutter everywhere!
How Do I Keep Storage Bins Clean and Dust-Free?
"You're probably thinking, 'Storage bins, the ultimate dust collectors!' But, ironically, they can be dust-free havens with regular maintenance. Simply vacuum or wipe them down, and employ dust prevention techniques like lining them with cloth or paper to keep your storage space spotless!"
Are Custom Storage Bins Suitable for Heavy or Bulky Items?
'When selecting custom storage bins for heavy or bulky items, you'll want to evaluate the weight capacity and durability of the material options, ensuring your organization stays tidy and your bins don't buckle under the pressure!'
Can I Make Custom Closet Storage Bins With My Kids?
'Grab thy hot glue gun, brave parent, and commence on a quest for crafting awesomeness with thy mini-me's! You'll create unforgettable DIY projects, instill organization tips, and conjure creative solutions that'll make Marie Kondo proud.'
Do Custom Closet Storage Bins Come With a Warranty or Guarantee?
'When purchasing custom closet storage bins, you'll want to check if they come with a warranty or guarantee, considering the return policy and durability. Look for material options and clear assembly instructions to make sure you're getting a quality product that'll last!'
Related Posts
-
Declutter Your Drawers: 10 Genius Storage Hacks
You can breathe new life into your cluttered drawers by implementing a few genius storage hacks. Start by maximizing ...
-
Maximizing Space With Smart Home Gadgets
By incorporating smart home gadgets, you can efficiently maximize every inch of available space in your home. In the ...

